Materials How to make a soft transition between grass and peebles near a swimming pool ?

Reddevil57

New member
Feb 20, 2020
3
0
Hi,
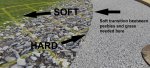
I would like to make a soft transition (hence the question :) beetween some lumion grass (landscape texture) and some Lumion peebles (with displacement)...
I know the Paint tool allowing such an effect in landscape mode but it only allows it with preset textures.
I then thought that I could load the peeble texture there to make this happen but when looking for the peeble texture in lumion's files, I find some ".sim" and ".sim.inn" I can't open...
Any idea pr procedure would be much appreciated as I am stuck with a brutal demarcation and it's ugly
 

Attachments

  • Annotation-2020-07-29-110429.jpg
    Annotation-2020-07-29-110429.jpg
    458.6 KB · Views: 90

Dimitris S

Administrator
Staff member
May 18, 2020
1,794
914
lumion.com
Yes, that makes sense.

The model in the image above is made of 3 flat surfaces: 1 for pebbles, 1 for rock, 1 for grass and all it uses is Displacement maps and Alpha Channels.

I will try to get a tutorial done for you, but in the meantime here is a screenshot of how the surfaces are overlayed in 3D:

aaaaa.PNG

Bottom line is that you need 3 surfaces: the purple for the pebbles, green for Landscape Grass and gray for the in-between (thick pebbles I guess in your case)

Here is where the fun begins:
For the gray surface, you need to create an Alpha Channel in Photoshop and mask its edges with a natural-looking brush. Then save the file as .TGA and use it as a texture in Lumion. The one I used looked like this:

1596038132197.png


I will explain this more in-depth in the tutorial (work in progress), but in the meantime, you can have a look at this video to see how .TGA files work and what the Alpha Channel does:
 
  • Like
Reactions: eaglestorm
Upvote 0

Dimitris S

Administrator
Staff member
May 18, 2020
1,794
914
lumion.com
Hello again Reddevil57,

Finally had a chance to do a more in-depth explanation.

1. As seen in this picture, you will need a minimum of 2 surfaces one next to the other. The third one can simply be the Landscape Grass.
1596091663723.png

The middle surface (gray) will need to overlap the other two with ~ 20-30% of its width)

2. Open the file in Lumion and assign the desired materials to the 3 surfaces

3. Download a new texture for the gray surface and open it in Photoshop.

4. Go to the 'Channels' and create a new Channel. It will automatically be called 'Alpha' and will be black.

01_Create Alpha Channel.PNG


5. Invert the colour to white (Select the Alpha Layer and press Ctrl+I)

6. Paint the edges black using a natural-looking brush. This will give you the mask for the way in which the middle texture (gray plane in this example) overlaps the other 2 nearby.

02_Alpha Texture.PNG


7. Save your texture in Photoshop as .TGA

03_TGA.PNG


8. In Lumion, select the material for middle surface and assign the created .TGA texture to Colour Map. Then, use the settings shown below:

04_Material.PNG


You also need to adjust the Flicker Reduction so the material is shown above the adjacent surfaces (purple and green in this example)

9. Adjust the Scale and Position of the material to perfectly fit its shape and the edges close to the other two surfaces.
 
Upvote 0

Dimitris S

Administrator
Staff member
May 18, 2020
1,794
914
lumion.com
Now for the fun part:
I have noticed that you have a curved surface. The workflow above is only valid for straight surfaces, but it can be adapted with a few extra steps. To do this:

10. Take a screenshot of your surface in plan view.

05_Curved.PNG


11. Overlap it over the texture you have opened in Photoshop and trim its edges to perfectly fit the shape of the curved surface.

07_Mask.PNG


12. Mask the texture according to the shape of the curve (in plan) and then hide the overlay you exported from the 3D software.

13. Repeat Steps 1 to 7 to create the edges and then save the file as .TGA

1596093641458.png


14. If the texture is too large, you will need to scale it down in Photoshop and copy paste it a bunch of times until the scale of the material fits properly the scale of the surface in the model.

15. Repeat Steps 8 and 9 until the texture fits the curved surface perfectly.

lum.PNG


Please note that the texture you will be using for the curved area needs to be very high resolution, otherwise it will look like the one in the screenshot above.

Let me know if you have any questions.
 
Upvote 0

Ken N

Member
Feb 21, 2020
160
149
Los Angeles, California, USA
Enter your latest Lumion version
10.3 Pro
Hi Reddevil57,

Dimitris has shown a great technique. However, there is another easier and faster way to do it. Just do 3 renderings - first image with only texture A (e.g. grass), another with texture B (e.g. gravels), and the last one with texture C (e.g. sand). Bring them into Photoshop by stacking them in the layers panel. Then create a mask for the top 2 layers. Finally, paint on the mask to reveal or hide parts of the textures.

Please check out this very cool video below by Nuno Silva. Fast-forward to about 8 minutes to see how he does it.

Hope this helps. Take care.

_Ken

 
  • Like
Reactions: eaglestorm
Upvote 0

Dimitris S

Administrator
Staff member
May 18, 2020
1,794
914
lumion.com
Hi Ken,

Indeed, that is a great way to go about it. I was trying to avoid post-processing as much as possible in my previous reply.

Truth be told though, the method you pointed out is considerably less time consuming and yields far greater flexibility for manipulating variants in the final image.

I would be curious to see Reddevil57's final result. :)
 
Upvote 0